When Foundry introduced Blinkscript for Nuke, I thought there would be an explosion of new tools being created by the community, in the way that Matchbox did for Flame. While a few select users embraced it, the learning curve is a bit steep, and the learning resources scarce. Many compositors have asked me to write about blinkscript, and while it would definitely be interesting, I don’t have the time required to do a full beginners intro to blinkscript.
Since trying HigX PointRender a few months ago, I did have an idea in the back of my mind: Create a Lightning bolt generator for Point Render using blinkscript.
Last weekend I finally acted on it. See the results in this video:
I will go in details over the theory behind how the tools is working, and cover the main logic of the tool in blinkscript. If you need a refresher on blinkscript before getting started, I invite you to have a read of the documentation, or watch this talk from Mads.
How to make Lightning
There are different ways to approach the recreation of a lightning bolt, which Xavier Martin covered pretty well in his article about X_Tesla.
The way I would like to do that is using the “random fractal” approach.

If we look at photos of lightning in google search and analyse the structure a little bit, we will notice that there is usually a “main” branch, which goes from the clouds to the ground, and then some secondary branches that branch off from the main branch at seemingly random points and going in semi random direction (not fully random though, as we notice they rarely move upwards).
Drawing a 3D line
Blinkscripts are not actually 3d operators, they do not deal with polygons or other types of 3d data, they are pixel operators. As we’ve seen in my previous posts about Higx PointRender, here and here, it uses position data stored in pixels (similar to a position pass) to draw 3D points. It also has a “Wire” render mode, where it can connect multiple points to create a line, which is going to be particularly helpful for us here.
Before we draw a 3D line, let’s start by drawing a 2D line in the blinkscript.
kernel PointLighning : ImageComputationKernel<ePixelWise>
{
  Image<eRead, eAccessRandom> format;
  Image<eWrite, eAccessRandom> dst;

  void process(int2 pos) {
    if (pos.x || pos.y ) {
      return;
    }
    // Here we're going to add our code
    int number_of_points = 50;
    for (int y = 0; y < number_of_points; y++) { // Iterate from 0 to number of points
      dst(0,y) = float4(1.0f); // This writes to the dst image at coordinates 0, y, value 1. WARNING! If the coordinates are outside of the BBOX, nuke will crash!
    }
  }
};
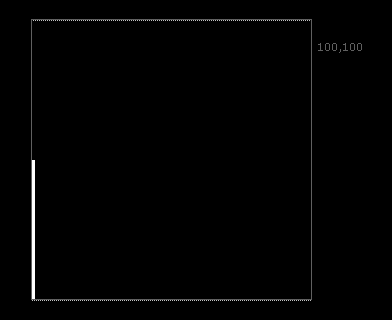
Beautiful 2D line
As you can read in the comments of the code, be careful when writing at coordinates of the destination image. If the coordinates fall outside the BBOX, nuke will crash (set the number_of_points to a value greater than your constant’s height if you want to test by yourself). There is a way to prevent this by adding a check before writing to the image:
if ( dst.bounds.inside( posx, posy ) ) {
  dst(posx, posy) = value;  // We only write is pixel is in bounds (bbox)
}
I had decided not to use this in my code because I control the bbox explicitly at all times. It may not be a great idea and I might end up changing it later.
While we now have a 2D line in our image, we need to switch our thinking away from thinking in terms of images, and start thinking in terms of data, and more precisely in terms of point position.
Right now I have 50 pixels, all at XYZ coordinates (1, 1 ,1). That is not a line, that is 50 points in the same point.
Let’s make these 50 points be a gradient from 0 to 1 now. (Note I won’t copy the whole blinkscript code from now on, only the parts that are changing, in order to keep things manageable)
    ...
    for (int y = 0; y < number_of_points; y++) {
      float gradient = y / float(number_of_points - 1); // I'm sure you can figure the math here. Note I have to convert something to float, otherwise we only have ints, and the result is odd
      dst(0,y) = float4(gradient);
    }
   ...
If I now try to preview this with a PositionToPoints node, we now have a 3d line.
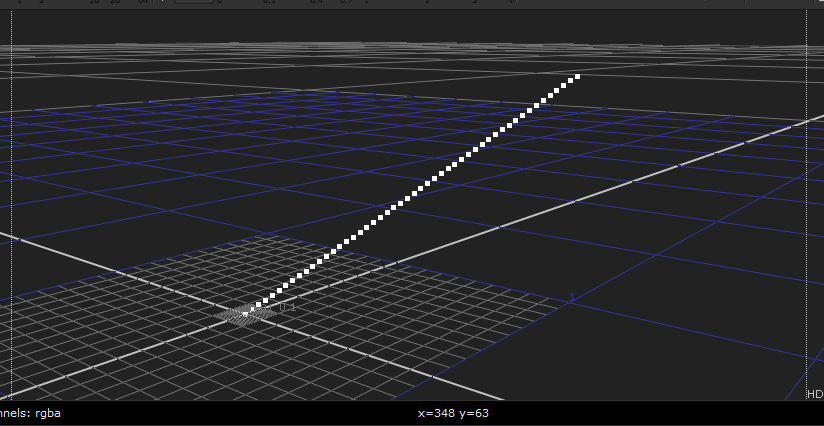
The points are going from point [0,0,0] to [1,1,1]. It’s not necessarily what we want but it’s a start.
We’re going to add 2 parameter, 3d vectors, to define the start and end point of the line we want to make.
Let’s do a bit of math, and assume we call our start point A, and end point B, and we give the following values:
A = [0, 0, 1]
B = [0, 1, 1]
We want our points to be in between these 2 points (or along the vector AB). There are multiple way we can calculate points in between these 2.
One way would be to calculate the vector AB:
AB = B-A = [0, 1, 1] – [0, 0, 1] = [0, 1, 0]
Then finding the middle point of vector AB (let’s call it M)
M = AB * 0.5 = [0, 1, 0] = [0, 0.5, 0]
Now since our representation of vectors are using a single point, our Vector AB was really starting from 0 instead of starting at point A, so we offset it back to point A (call it point P):
P = M + A = [0, 0.5, 0] + [0, 0, 1] = [0, 0.5, 1]
I’ll let you validate that indeed, point P falls exactly between points A and B. There’s a more convenient way (if maybe a bit less instinctive geometrically speaking?) to get this however. It turns out that we can simply mix the 2 values by a certain amount. This is what we’re doing every day in comp when using for example a Keymix node, or using the mix knob. Let’s assume now that we call our mix amount V, a mix function would look like this:
V = 0.5
P = A*(1-V) + B*V = [0, 0, 1] * (1-0.5) + [0, 1, 1] * 0.5 = [0, 0, 0.5] + [0, 0.5, 0.5] = [0, 0.5, 1]
Which gives us the same result. We can try 0% mix, which should give A, or 100%, which should give B:
V = 0
P = A*(1-V) + B*V = [0, 0, 1] * (1-0) + [0, 1, 1] * 0 = [0, 0, 1] + [0, 0, 0] = [0, 0, 1] = A
V = 1
P = A*(1-V) + B*V = [0, 0, 1] * (1-1) + [0, 1, 1] * 1 = [0, 0, 0] + [0, 1, 1] = [0, 1, 1] = B
Seems like we’re all good. Now it’s easy to build this into a little function:
inline float3 mix(float3 A, float3 B, float amount){
  return A*(1.0f-amount) + B*amount;
}
When defining functions in blinkscript it can either be “inline” or not. This can be a pretty complex subject to explain, but the basic idea is that that an inline function will be “copied” into the code at compile time, making the compiled code “larger”, but the execution a bit faster. This is extremely simplified, but I invite you to read the Wikipedia page about it or do your own research.
We already have a gradient that we can use as the mix amount, what a convenient coincidence. Our full code now look like this:
// Functions are usually defined before the kernel itself
inline float3 mix(float3 A, float3 B, float amount){
  return A*(1.0f-amount) + B*amount;
}

kernel PointLighning : ImageComputationKernel<ePixelWise>

{
  Image<eRead, eAccessRandom> format;
  Image<eWrite, eAccessRandom> dst;

  param: //Parameters available to the user
    float3 start, end; // We add 2 parameters for the start and end points

  void process(int2 pos) {
    if (pos.x || pos.y ) {
      return;
    }
    // Here we're going to add our code
    int number_of_points = 50;
    float gradient; // Instead of redefining gradient all the time in the loop, define it once but don't give it a value.
    float3 position; // I define a 3d vector here.
    for (int y = 0; y < number_of_points; y++) {
      gradient = y / float(number_of_points - 1);
      position = mix(start, end, gradient);
      dst(0,y) = float4(position.x, position.y, position.z, gradient); // dst needs a float4, not float3, so we put XYZ in there. Put the gradient in alpha, because why not
    }
  }
};
Let’s set start and end to the same values we used before in A and B:
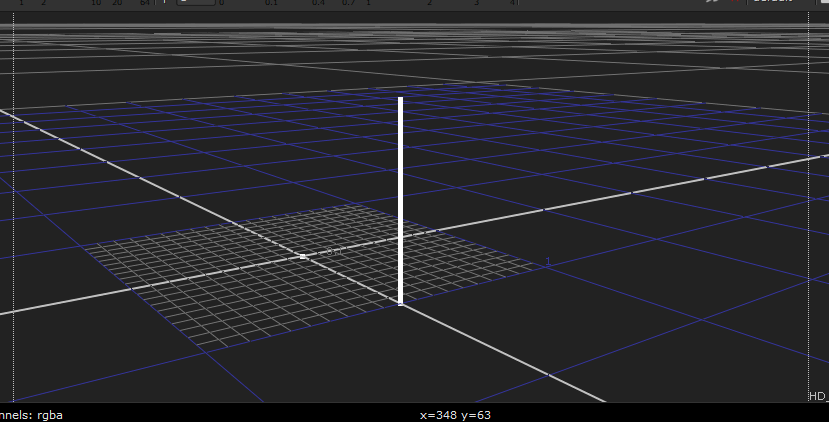
Our line now respects our start and end points. Yay. (ignore the little point at 0, this is from all the pixels at 0 that we didn’t set at all)
Adding branches
Right now we only have the one branch, but really we will want more.
Let’s start adding more. To keep it simple for now we’ll just offset each branch by 1 in x. (And I got my first crash of the day now, blinkscript is fairly sensitive, so I highly recommend to write the code in a separate IDE and copy/paste into nuke to avoid losing code)
...
  void process(int2 pos) {
    if (pos.x || pos.y ) {
      return;
    }
    // Here we're going to add our code
    int number_of_points = 50;
    int number_of_branches = 25;
    float gradient;
    float3 position;
    for (int x = 0; x < number_of_branches; x++) {
      for (int y = 0; y < number_of_points; y++) {
        gradient = y / float(number_of_points - 1);
        position = mix(start, end, gradient);
        position += float3(x, 0.0f, 0.0f);
        dst(0,y) = float4(position.x, position.y, position.z, gradient);
      }
    }
  }
};
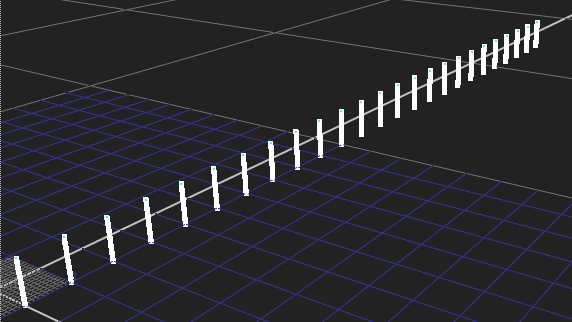
Not quite a lightning bolt yet, but we have multiple sticks.
Setting the proper start and end points for each branch
We want every branch (except for the main branch) to be spawned from another branch, rather than just being offset. For now we’ll just make each branch spawn from the middle of the previous branch. To make the result visible, we’ll make all the odd number branches horizontal and the even branches vertical.
...
  void process(int2 pos) {
    if (pos.x || pos.y ) {
      return;
    }
    // Here we're going to add our code
    int number_of_points = 50;
    int number_of_branches = 25;
    float gradient;
    float3 position;
    float3 branch_start, branch_end; // We now need to change the start and end on a per brach basis
    float3 target; // That will be our horizontal or vertical target
    for (int x = 0; x < number_of_branches; x++) {
      if (x == 0) {  // for branch 0, we use the start and end
        branch_start = start;
        branch_end = end;
      }
      else { // for other branches we do something different
        if (x % 2 == 0) { // check if even number
          target = float3(0.0f, 1.0f, 0.0f); // vertical vector
        } else {
          target = float3(1.0f, 0.0f, 0.0f); // horizontal vector
        }
        float4 sample = dst(x-1, number_of_points / 2); // Sample the output image that we wrote on previous iteration. Sample middle point for now.
        branch_start = float3(sample.x, sample.y, sample.z); // Get rid of the alpha
        branch_end = branch_start + target; // we add the horizontal or vertical vector
      }
      for (int y = 0; y < number_of_points; y++) {
        gradient = y / float(number_of_points - 1);
        position = mix(branch_start, branch_end, gradient); // we changed here to the per branch
        // don't forget to remove the offset we had added before here
        dst(x,y) = float4(position.x, position.y, position.z, gradient);
      }
    }
  }
...
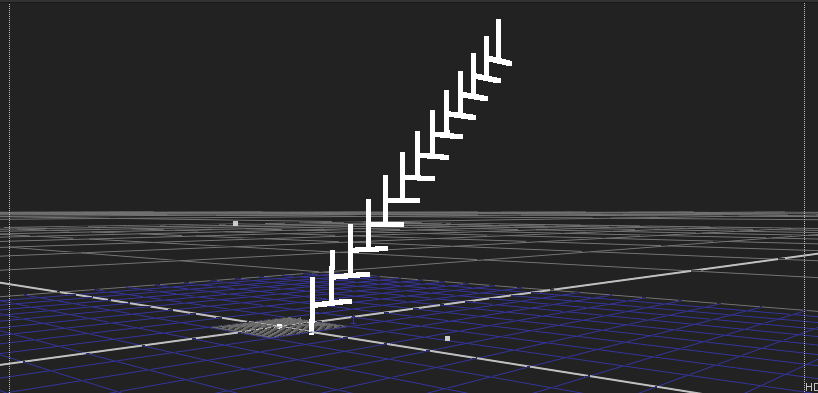
Branches now properly source the previous branch as their starting point.
Adding randomness
Annoyingly, blinkscript doesn’t have a random function, which doesn’t make our life easier to add randomness to our lightning bolt.
I’m going to use the random function from https://www.shadertoy.com/view/Xt23Ry
inline float fract (float x) {return x-floor(x);}
inline float random(float co) { return fract(sin(co*(91.3458f)) * 47453.5453f); }
and then expend it to make a function that will give me a random vector. Getting truly random values is harder than expected in code, numbers tend to repeat themselves. Luckily we don’t need a perfect random function here, so I’m just putting arbitrary values in there to scramble numbers.
inline float3 randomv(float3 seed)
{
  float scramble = random(seed.x + seed.y * seed.z);
  float3 rand;
  rand.x = random(seed.x + scramble + 0.14557f + 0.47917f * seed.z)*2-1;
  rand.y = random(seed.y * 0.214447f + scramble * 47.241f * seed.x)*2-1;
  rand.z = random(seed.z * scramble + 3.147855f + 0.2114f * seed.y)*2-1;
  return normalize(rand);
}
Let’s now use our randomv function to define the target rather than the horizontal/vertical vector
...
void process(int2 pos) {
    if (pos.x || pos.y ) {
      return;
    }
    // Here we're going to add our code
    int number_of_points = 50;
    int number_of_branches = 25;
    float gradient;
    float3 position;
    float3 branch_start, branch_end;
    for (int x = 0; x < number_of_branches; x++) {
      if (x == 0) {
        branch_start = start;
        branch_end = end;
      }
      else {
        float4 sample = dst(x-1, number_of_points / 2);
        branch_start = float3(sample.x, sample.y, sample.z);
        branch_end = branch_start + randomv(branch_start); // we add a random vector
      }
      for (int y = 0; y < number_of_points; y++) {
        gradient = y / float(number_of_points - 1);
        position = mix(branch_start, branch_end, gradient);
        dst(x,y) = float4(position.x, position.y, position.z, gradient);
      }
    }
  }
...
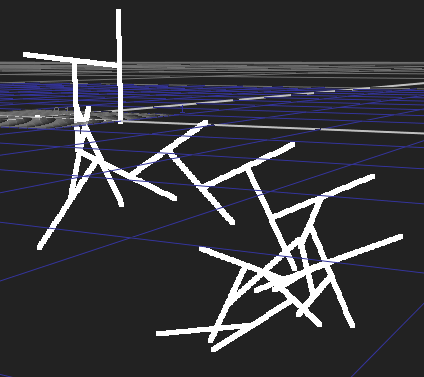
In addition to randomizing the direction, we can randomize the source point, and the source branch, but a new problem arises here: our random function returns a number between 0 and 1, but for both the source point and the source branch, we’ll need a random integer instead. For the source point, we need a random value between 0 and the number of points, for the source branch we need a random number between branch 0 and the current branch – 1.
For this, we’ll introduce a new function again: remap
inline float remap(float val, float ori_min, float ori_max, float new_min, float new_max)
{
  float ori_range = ori_max-ori_min;
  float new_range = new_max-new_min;
  return (((val - ori_min) * new_range) / ori_range) + new_min;
}
This works like a grade node’s black point, white point, lift, gain.
We can now randomize our source point and source branch.
...
// Here we're going to add our code
    int number_of_points = 50;
    int number_of_branches = 25;
    float gradient;
    float3 position;
    float3 branch_start, branch_end;
    float2 random_source; // I will use random_source x for branch source, y por point source
    for (int x = 0; x < number_of_branches; x++) {
      if (x == 0) {
        branch_start = start;
        branch_end = end;
      }
      else {
        // Pick from another random point
        random_source = float2(random(12.545f+x), random(3.14f+x)); // In order to not get the same number in x and y, I just add some different values in both
        random_source.x = remap(random_source.x, 0, 1, 0, x-1); // Remap between 0 and x-1
        random_source.y = remap(random_source.y, 0, 1, 0, number_of_points-1); // Remap between 0 and the number of points
        float4 sample = dst(random_source.x, random_source.y);
        branch_start = float3(sample.x, sample.y, sample.z);
        branch_end = branch_start + randomv(branch_start);
      }
      for (int y = 0; y < number_of_points; y++) {
...
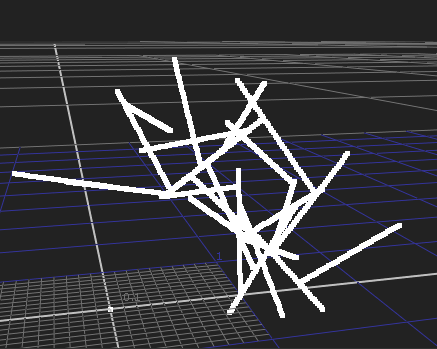
Things are starting to look pretty random. We can now find that some parent branches have multiple child branches.
I’m not going to cover every single step here, but you could add a random scale to the branches, or probably some other kind of randomness.
Controlling the chaos
In the final code, which I’ll make available on Nukepedia or you can get here on Github, (the code is not necessarily as clean as the one I’m remaking here for the tutorial), you will notice that I have added ranges to control certain random attributes. For example I have a minimum scale and minimum scale, or a range for the point at which a new branch may spawn. If a new branch may only be spawned from the first half of each branch, you can simply use the remap function: remap(value, 0.0f, 1.0f, 0.0f, 0.5f)
Slightly trickier, I want to control the direction of the branches a bit more, as complete randomness like we have currently doesn’t particularly look like a lightning bolt.
To do that, I will use the mix function again, and mix the random vector with the vector defined by our start and end points. I’m make a spread parameter so that we can control this amount of spread. I’ll also use the normalize and length functions (they are default in Blink) to ensure that I’m not changing the length of the branches.
The idea is that I first normalize the original vector (which is end-start), which makes it length 1, which is also the length of the randomv. I then mix the 2, which gives me a new vector in between the random one and the original one, which could be any length. I normalize this again, then multiply it by the length of the original vector so that it becomes the same length. Oof, that’s a mouthful. Take a second to go over it.
...
  param: //Parameters available to the user
    float3 start, end;
    float spread;  // Introduce the spread parameter

  void process(int2 pos) {
    if (pos.x || pos.y ) {
      return;
    }
    // Here we're going to add our code
    int number_of_points = 50;
    int number_of_branches = 25;
    float gradient;
    float3 position;
    float3 branch_start, branch_end;
    float2 random_source;
    float3 target; // I reintroduce the target variable, as doing all the calculations in a single line could be hard to read
    for (int x = 0; x < number_of_branches; x++) {
      if (x == 0) {
        branch_start = start;
        branch_end = end;
      }
      else {
        random_source = float2(random(12.545f+x), random(3.14f+x));
        random_source.x = remap(random_source.x, 0, 1, 0, x-1);
        random_source.y = remap(random_source.y, 0, 1, 0, number_of_points-1);
        float4 sample = dst(random_source.x, random_source.y);
        branch_start = float3(sample.x, sample.y, sample.z);
        target = normalize(mix(normalize(end-start), randomv(branch_start), spread)) * length(end-start); // Try to follow that
        branch_end = branch_start + target;
      }
      for (int y = 0; y < number_of_points; y++) {
        gradient = y / float(number_of_points - 1);
        position = mix(branch_start, branch_end, gradient);
        dst(x,y) = float4(position.x, position.y, position.z, gradient);
      }
    }
  }
...
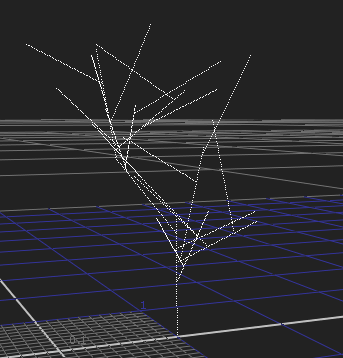
We now play with the spread parameter, and see how this behaves. The spreading works as expected, but the branches jump around unexpectedly. This is because we’re using the source position as a seed, and when we start spreading the branches, their children now get a new seed, resulting in a completely different random value. Let’s just change that seed to x.
...
        target = normalize(mix(normalize(end-start), randomv(float3(x)), spread)) * length(end-start);
...
That works better, we can now change the spread without regenerating completely new seeds every time.
Making the branches smaller and smaller
At the moment, our branches are all the same length (unless you’ve added your own random parameter here).
Looking a lightning references, we see that generally the main branch will be the longest. Also, the closest from the root they spawn, the longer they tend to be.
In order to do that, I can add a parameter to check how far along the root was, make the branch length. We sort of have that stored as the gradient already (in the alpha channel), but this goes from 0 to 1 for each and every branch. I’m having a hard time putting this into words, but if we have branch 0 going from 0 to 1, and branch 1 spawning from 0.5 of branch 0, currently that branch will also have a gradient from 0 to 1, but we actually want it to go from 0.5 to 1. This way we know this branch should be half as long as branch 0.
...
    float3 branch_start, branch_end;
    float2 random_source;
    float3 target;
    float branch_length; // We add a variable to calculate the scale of the branch
    float overall_progress = 0.0f; // We store the overall progress so that on each branch we can remap the progress properly
    for (int x = 0; x < number_of_branches; x++) {
      if (x == 0) {
        branch_start = start;
        branch_end = end;
      }
      else {
        random_source = float2(random(12.545f+x), random(3.14f+x));
        random_source.x = remap(random_source.x, 0, 1, 0, x-1);
        random_source.y = remap(random_source.y, 0, 1, 0, number_of_points-1);
        float4 sample = dst(random_source.x, random_source.y);
        branch_start = float3(sample.x, sample.y, sample.z);
        overall_progress = sample.w; // We store the progress in alpha, so it's easy to retrieve
        branch_length = 1.0f - overall_progress; // This tells us how much is left between 1 and the source progress
        target = normalize(mix(normalize(end-start), randomv(float3(x)), spread)) * length(end-start);
        branch_end = branch_start + target * branch_length; // We multiply the target by the branch length
      }
      for (int y = 0; y < number_of_points; y++) {
        gradient = y / float(number_of_points - 1);
        position = mix(branch_start, branch_end, gradient);
        dst(x,y) = float4(position.x, position.y, position.z, remap(gradient, 0, 1, overall_progress, 1)); // Instead of storing the actual gradient, we remap the gradient from the overall_progress
      }
    }
...
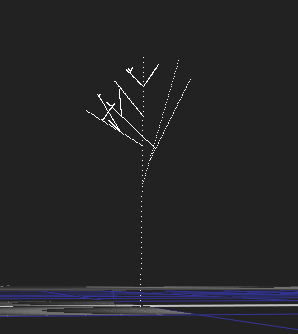
If one were now to travel from any tips to the root, the distance traveled would always be the same. I could have added a parameter to mix between this “relative scale” and our previous “absolute scale”, but instead in the release script I have made it a checkerbox, so it’s one or the other, not a mix. Maybe for v2.
Adding noise
This could almost pass for a lightning bolt already, but it’s missing something critical: Noise
We could add a Fractal Noise from Higx to this, which would almost do the trick, but might mess up the shape a little bit too much, and branches that are closer to each other would likely react the same way. I would also like to not affect the root or tip of each branch.
Noise is even trickier to handle in blinkscript than just a random value. A good base for it is Mads’ 4D Noise
You can pretty much copy all the functions from this (but not the kernel itself) or copy them from the release version of my lightning tool. This is way out of scope of this tutorial.
And then add these functions as well:
float fBm_4d(const float octaves, const float lacunarity, const float gain, const float4 coord, float amplitude)
{
  float total = 0;
  float4 frequency = coord;
  for( int i=0; i < octaves; i++ ) {
    total += (float)raw_noise_4d(frequency) * amplitude;
    frequency *= lacunarity;
    amplitude *= gain;
  }
  return float(total);
}

float3 fBm_4d_3d(const float octaves, const float lacunarity, const float gain, const float4 coord, float amplitude)
{
  float3 sample;
  sample.x = fBm_4d(octaves, lacunarity, gain, coord, amplitude);
  sample.y = fBm_4d(octaves, lacunarity, gain, coord + 100.0f, amplitude);
  sample.z = fBm_4d(octaves, lacunarity, gain, coord + 200.0f, amplitude);
  return sample;
}
We also need to add variables for octaves, lacunarity, gain, amplitude.
...
    float3 branch_start, branch_end;
    float2 random_source;
    float3 target;
    // Add noise variables
    int octaves = 5;
    float lacunarity = 2.0f;
    float amplitude = 0.5f;
    float gain = 0.5f;
    float3 noise; // This one will st0re the result of the noise

    float branch_length;
    float overall_progress = 0.0f;
...
Now, we will need to calculate the noise for each branch:
...
for (int y = 0; y < number_of_points; y++) {
        gradient = y / float(number_of_points - 1);
        position = mix(branch_start, branch_end, gradient);
        noise = fBm_4d_3d(octaves,lacunarity, gain, float4(position.x, position.y, position.z, x*100), amplitude); // I use the position as a seed, and the branch number as a seed in w
        position += noise; // add noise to position
        dst(x,y) = float4(position.x, position.y, position.z, remap(gradient, 0, 1, overall_progress, 1));
      }
...
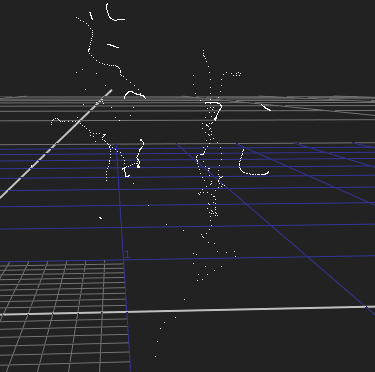
Not quite there yet, because we apply the noise to the whole branch, and because each branch has a different seed, the branches are disconnecting.
I want to apply the noise based on the gradient. I could protect just the roots, which would be pretty straight forward, but in my case I would like to apply the effect fully in the middle of the branch, and not at all at the tip.
For that I need to remap my gradient 0>0.5>1 to 0>1>0. The math for that: (1.0f – fabs(gradient * 2.0f – 1.0f))
...
for (int y = 0; y < number_of_points; y++) {
        gradient = y / float(number_of_points - 1);
        position = mix(branch_start, branch_end, gradient);
        noise = fBm_4d_3d(octaves,lacunarity, gain, float4(position.x, position.y, position.z, x*100), amplitude);
        position += noise * (1.0f - fabs(gradient * 2.0f - 1.0f)); // weight the noise
        dst(x,y) = float4(position.x, position.y, position.z, remap(gradient, 0, 1, overall_progress, 1));
      }
...
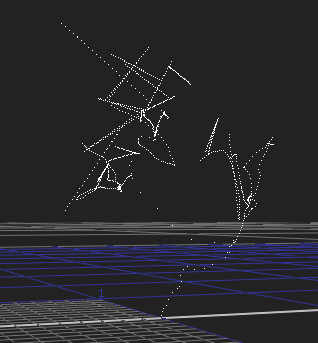
We’re getting closer, but clearly the intensity of the noise is too extreme on the smaller branches.
That’s easy enough to fix:
...
for (int y = 0; y < number_of_points; y++) {
        gradient = y / float(number_of_points - 1);
        position = mix(branch_start, branch_end, gradient);
        noise = fBm_4d_3d(octaves,lacunarity, gain, float4(position.x, position.y, position.z, x*100), amplitude);
        position += noise * (1.0f - fabs(gradient * 2.0f - 1.0f)) * (1.0f - overall_progress); // multiply by branch length (which I recalculated because I didn't have it on branch 0)
        dst(x,y) = float4(position.x, position.y, position.z, remap(gradient, 0, 1, overall_progress, 1));
      }
...
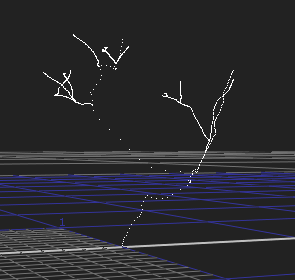
Here we go. We have a cute little lightning bolt.
From there you can add randomness in many of the variables, expose some variables as parameters, wrap it all up in a gizmo.
I’ll let you explore the full tool on github or nukepedia, but if you open it up and look at the code you will notice it is very very similar to this. I added a secondary noise as another node, and generate a color based on other nodes as well. I made sure the input constant is exactly the number of pixels I need, etc..
Github link: https://github.com/herronelou/nuke_stuff/blob/master/toolsets/blinkscript/lightning_generator.nk
Nukepedia Link: TBD


Impressive and really cool!
Dude that’s sick! !! bravo !
Well done, this is no small accomplishment
Nice work! Thx for the tutorial! I wondered a long time ago how Xavier Martín made his Lightning Gizmo ”
X_Tesla” with Nuke, but this is some next level s***! I have to learn more about Blinkscript!
Great usage and very thorough tutorial on using the Blinkscript node! Thank you!
hi great beakdown, Erwan very impressive,
However ive noticed that the .nk script that you provided on your git hub gives an error
Lighnin.BlinksScript1.maxTiles : No such knob.
Lighnin.BlinksScript1.BlinkScript1.100 , no such knob
and the onscreen controls seems not to be working properly in the GUI.
Hi Patrick,
Which version of nuke are you using? The “no such knob” messages usually appear when opening a script on an older version of nuke than originally created in.
When I open the nuke script, the result is a 20 by 400 pixel image. Nuke12.0v2 Linux
Hi, this is normal, that image needs to be plugged in the PointRender node that you can buy on higx.net/point_render/
Great work as always!
is it possible to remove/hide the core (branch 1)?
bigger scenes, the core becomes problematic. it comes out mostly straight line.
and doesn’t get the same turbulence as the rest of the branches.
Hi Kelvin. You can remove the core branch by cropping the leftmost column of pixels. Or you could look at increasing the noise on that first branch so that it’s less straight. Feel free to email me a copy of the node with your settings to see how it looks.