
While Vray is remarkably intuitive for some daily operations, others might require a much more convoluted process.
The creation of non-standard render passes, and especially the “Pref” pass is one of these (read that P-ref, like you’d read T-Rex).
A few tutorials cover how to render custom render passes (a.k.a. AOVs) such as this one from Brian Freisinger back in 2012.
However, despite a lot of Google searches, I could not find any explanation how to create that mysterious Pref pass.
I knew it was possible because I have used it in productions rendered in Vray, but it seems like nobody wanted to share the goods.
A Pref pass? What is that?
Naming of passes seems to be a bit non-standardized, but I have mostly encountered that one as “Pref” which stands for “Position Reference”.
Many of you are familiar with Pworld passes, also known as Position World, XYZ, Point Position, or combinations of them. For Clarity I will always refer to it as “Pworld” from now on.
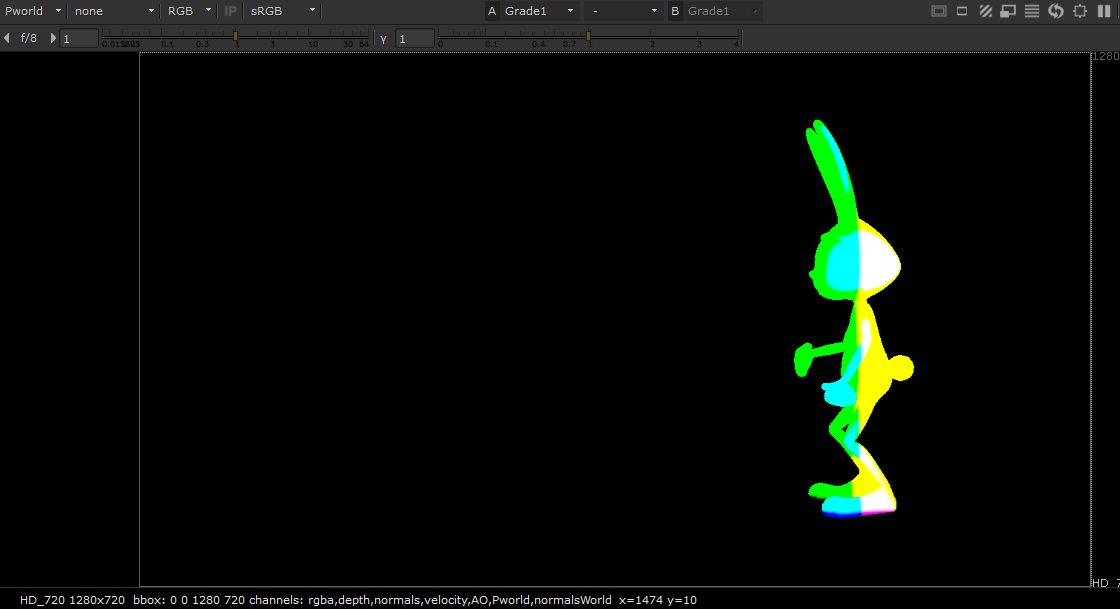
The Pworld pass of a Rabbit.
The Pworld pass is often used either for relighting, or to make position based mattes with a gizmo such as P_matte by Ivan Busquets.
Enter the Pref, or Points Position Reference:
It looks a lot like the Pworld, however it has the ability to be “stuck” to moving objects (In Renderman, it will be called WPref, please note we’re still talking about a pass in World space here).
Notice how the texture seems to stick to the object on the Pref side, while it looks like the object is moving through it on the Pworld.
That means it can be used to create lighting or mattes that stick to the object, using the exact same toolsets we’d use with Pworld.
See an example with relighting in this Youtube Video by Sangho Jung. Also some working example in the great breakdown of District 9 for FXguide (see around 7min10s, where he [un]surprisingly calls it a Preference pass).
Great, but how do we render it?
First thing to do in Maya is pick a frame where both the Pref and Pworld will be similar.
Select the object for which you want to make a Pref pass and in the Rendering Menu select “Texturing > Create Texture Reference Object”

Repeat for each object that needs to be affected by the Pref pass. This will create Reference objects from which the Position data will be calculated.
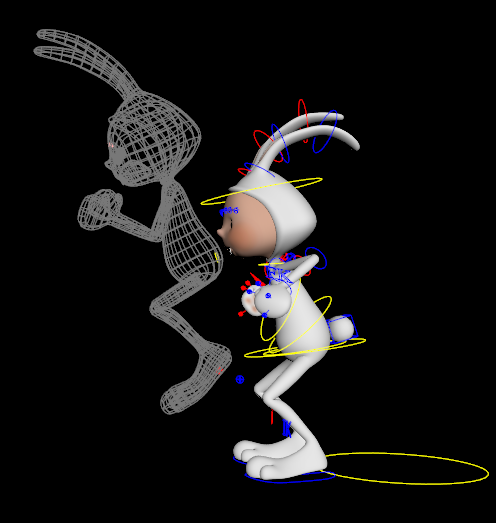
Notice the wireframe representing our reference objects are not animated while we playback the animation.
Then we need to create a Vray Extra Tex render Element (In render Settings):
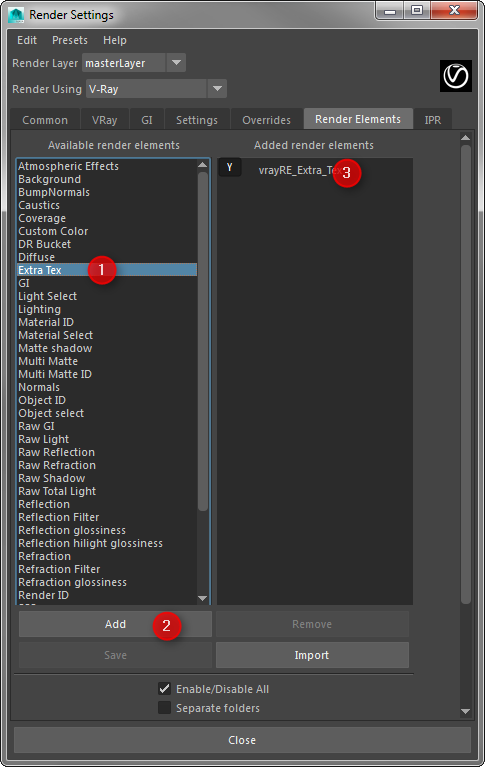
Then in the properties of the render element, disable “Consider for Anti-Aliasing” and set the Explicit Channel name to whatever you would like your channel to be named (how it will show in Nuke). You might as well rename the render element for clarity.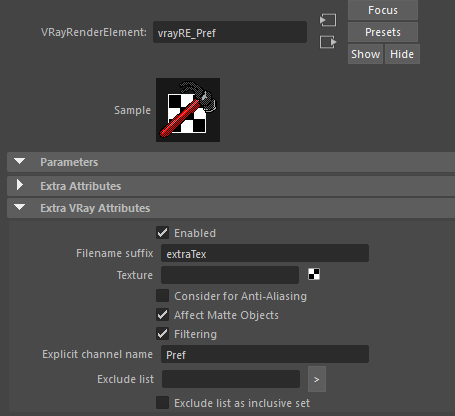
In the HyperShade, create a single SamplerInfo node.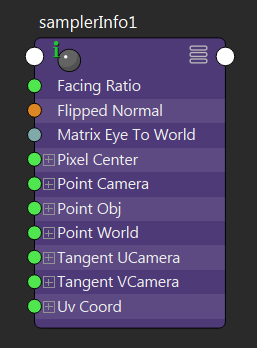
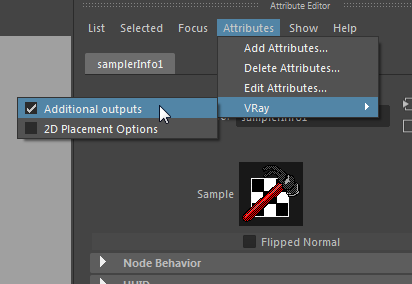
With that node selected, in the Attribute editor, enable “Attributes > Vray > Additional outputs”.
Now for the slightly delicate operation: Select the previously created Render Element to open its attribute Editor. In the Hypershade, middle click the SamplerInfo node and drop it onto the Texture Input of the render element. Make sure you drop it onto the Label of the Texture input. If you did it right, a Connection Editor will open.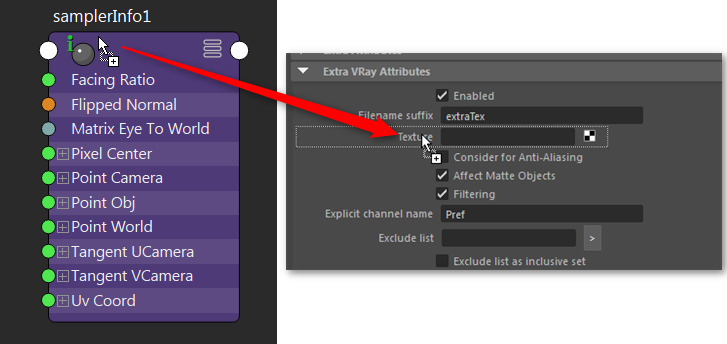
In the Connection Editor that opens, Click vrayPointWorldReference on the left, and vray_texture_extratex on the right.
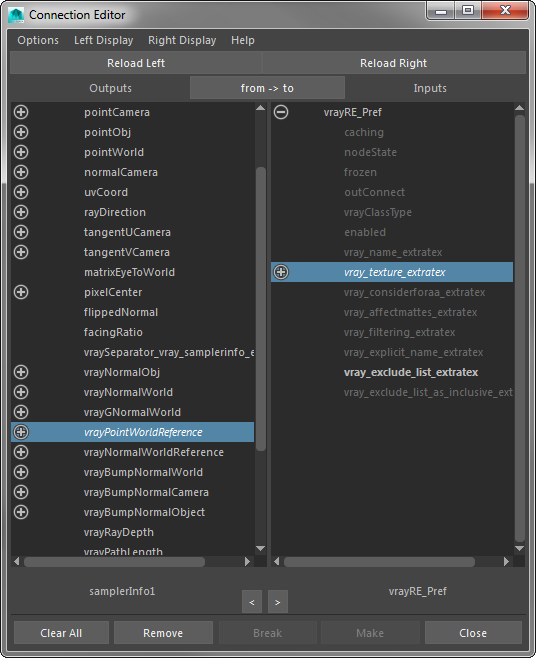
You may now close the connection editor and render your animation.
Don’t forget to set your rendering to EXR multichannel if you want to make full use of these extra passes.
Credits
Thanks to SHVFS and Shawn Tilling for letting me use their Rabbit Character for this Tutorial, it wouldn’t have been the same with my Spheres.
Animation was done as an animation assignment by student Desmond Jin.
Hi Erwan,
Thanks for posting this — sounds like this pass confuses a lot of us, especially if (like me) your comping skills aren’t quite advanced to the level of using these types of passes. I have a couple of questions. First of all, you say “…pick a frame where both the Pref and Pworld will be similar.” What does that mean, and how do you identify which frames will be similar?
Secondly, is the technique here the same as connecting the pointObj attr. of the Sampler Info node to the extraTex?
We use this approach where I work. This pre-dates me, but appears (at least to me) to give the same result as the left hand example of your jumping rabbit. However, one of the other artists here has shown me how he does it and it requires that all geometry is moved into the positive X-Z quadrant of world space, where it has all its transforms zeroed out. However, the rendered pass is then correct with any animation and doesn’t require the creation of a texture reference object as per your approach.
Let me know what you think! Cheers.
Hi Steve.
What I mean by that is that you need to create the texture reference object at a certain frame (or could be in a T-pose), and that the position data will be driven by the reference object’s position rather than the rendered object’s position. In the case where you actually froze the animation at a certain frame, both PWorld and PRefWorld would look similar on that frame (because Rendered object and Ref object overlap at that frame).
Nope, PointObj refers to the position in object space rather than world space. PointObj can be used in a similar fashion for non deforming geometry as it gives the position relative to the pivot point rather than the scene’s origin. PointObj reference is also possible, so that it would handle deformation, however I’m not a fan of P passes in object space because 2 completely different objects may have the same coordinates relative to their pivot.
You have lost me a bit on this one. I’m sure there are different ways of achieving the same result (baking a Pworld to textures would be another one), but I’m not entirely sure about what your colleague is doing. If you’re ever able to provide me with more detailed steps I’m always interested in learning a new way to do things. Moving all to the positive X-Z(how about Y?) quadrant sounds like a workaround to avoid negative values, maybe to render as something other than openexr?
Hi – great explanation and one hard to come across!
One other thing that I can’t get my head around is what would the difference/use be between this and a uv pass/aov?
Hi. Sorry I had missed that comment.
The main difference between this and a UV pass, is that the UV pass gives you a 2D coordinate system, along with the seams that go with it. Position passes give you a 3D point instead, which has no seams. They are not particularly different in terms of what you can do with them, but the techniques to use them differ. You’d generally use a P_matte type of node to generate mattes out of a Pworld/Pref, which is sort of a volume matte (points within the volume are white, otherwise black). With a UV Map you’d draw rotos in UV space trying to find the right place to draw it. It can get much more precise but requires more time to setup.
With a UV pass you can retexture an object (if you don’t care too much about filtering) which you can only do via projection on a Plane pass, etc..
Hi Erwan, thanks for the replies — only just saw them.
So we are creating an object point position pass here, and yes moving objects into +Z and +X is to avoid negative values (everything is already in +Y). This is primarily what I’m trying to avoid doing as obviously this can create headaches with the hierarchy, i.e. you don’t want to have to mess with your scene hierarchy just to get this set up.
Also, the issue of deforming objects has now come up as well, and for obvious reasons it’s not normally possible to zero out geo that is deformer driven. A texture reference object might work in this case, I guess? Perhaps by getting the TRO set up correctly — this ought to pass the RGB values to the rendering geo.
Still not entirely sure what you mean by making sure Pref and Pworld are similar. I’m familiar with texture reference objects but not sure why it matters that these two passes approximate each other at a particular frame.
Unfortunately this is a pass I am not really familiar with but trying to work other artists here to get a solution that works for everyone as easily as possible.
It’s not that it matters that the Pref and Pworld are similar in one frame, it’s the result of the texture ref object. If I make my texture reference object in the pose and world position of my frame 1, then Pworld and Pref are going to be similar in that frame, since object=ref.
Hello~
Can I ask a quick question?
If I render the ‘Position refrence’ pass, then is it impossible to render ‘Position World’ in the same exr file?
Is there a way to render out both ‘Position World’ and ‘Position Reference’ passes at the same time, same object?
It should still work, make sure to pick point world not “reference”.
I haven’t done this for a while but I think it used to work.
For anyone stumbeling across this that needs to do it with yeti furr::
https://forums.chaosgroup.com/forum/chaos-common/chaos-common-public/75165-point-world-reference-pass-with-yeti-fur
This seems to work , you need to pass a special attribute to vray from yeti. you need a texture reference anyhow when connecting fur/hair to a animated mesh.
how can i render Pref in arnold maya ?
I don’t know, because I haven’t touched Maya in years, but a quick Google search implies that you would do it via a Texture reference object, and a samplerInfo.