
Even though it’s the compositor’s bread and butter, Keying can still be a particularly painful subject.
I’ve been pulling keys for over a decade, yet it is often scarier than comping a full CG realistic shots with projected matte paintings and volumetric smoke. One can never have too many tools on their belt for pulling a good key.
In this post, I will be going over the existing keyers very quickly (they’re not the point here) so that we have a very basic understanding of how they work, and how we can extrapolate their logic to come up with our own Keyer. I could make a gizmo that implements one version of such a new Keyer (let me know if you’d like that), but the point here is to present the concept to you so that you can customize it as per your own needs.
Existing Keyers and how they work
I can’t go in details over the math of every keyer because some of them are not publicly shared and some of them I just don’t know, however we can classify them in 3 broad categories.
Thee categories are my own, they are not an official name or anything, but they help me organize them in my mind:
1D Keyers:
These are the simplest keyers one could thing of. I call 1D Keyer any Keyer that works on a single channel. In Nuke, that would be the Keyer node, or anytime you create a custom matte by extracting a single channel and modifying it to turn it into an alpha. While multiple channels are needed to create some other channel sometimes, for example Luma, I still categorize a Luma Keyer as 1D, as it’s still a single channel operation, just in a different colorspace.

Algorithmic Keyers:
Algorythmic Keyers are the bulk of the Keyers out there. They often work by comparing the values in some channel with values in other channels. A simplistic algorithm example would be: Set the alpha to black if the green value is greater than the average of the blue and red values, else set the alpha to white (or in Nuke expression: g < (r+b)/2). That is of course a pretty terrible Keyer I wrote right there, though it is one used in quite a few despill algorithms. IBK, Keylight and Flame’s master keyer are examples of such keyers. These algorithms tend to be kept secret, though you can find some of them online (Like the IBK that has been dissected by a few people).
3D Keyers:
The 3D keyers work with the idea that each color can be represented as a 3d position. Whether it uses RGB as XYZ or another mapping depends on implementations. From there, all the pixels of your image can be represented as a 3d point cloud (hey, kind of like when we made custom scopes with higx PointRender). 3D shapes are used to define the keyed areas. For example a sphere. Any point falling within the sphere would be opaque, and a point outside the sphere transparent, or vice versa. Primatte is an example of such a Keyer (See how primatte works). Mad’s Cube Keyer or Flame’s 3D keyer are other examples. Ultimatte, if I understand properly, is an Algorithmic Keyer, but the algorithm could be represented as a 3D keyers as well.
If you’re interested in learning a bit more about Keyer history, I recommend this nice (although nearly 15 years old) fxguide article: Art of Keying
As you can read, little has evolved over the last 15 years. Though it seems like Machine Learning could bring a whole new category of keyers in the near future.
Making a new Keyer
As seen above, there are 1D and 3D keyers, but there isn’t really anything out there using 2D keyers (although both what I call 1D and Algorithmic Keyers are often called 2D keyers by others, I coudn’t call them that otherwise I would be out of a name for what we’re going to look at now).
The idea of this method is to represent the image as a 2D point cloud (vs 1D points or 3D points above) and use some sort of shape to define which area should be transparent or solid, as well as softness. This is convenient because we have some great tools to define areas in 2d: Roto and Rotopaint, as well as a great tool to do 2d mapping: STMap.
Since we’re in 2D, we can now use 2 channels as our 2 axes. Which 2 you would like to use is sort of up to you, and based on your specific footage. I will be using a plate from the Open Source project Tears of Steel, which you’ve probably seem many times, and can download here: https://media.xiph.org/tearsofsteel/tearsofsteel-footage-exr/02_3c/linear_hd/
For chroma keying, two channels that make sense for this approach are the cb and cr channels of the Ycbcr colorspace, though Luma and Hue could work, or Hue and Saturation, etc..
I’m sure I’m not the first person to come up with this approach, but I can’t find it documented anywhere, so if you’ve seen it before get in touch with me I’d be curious to find its origins.
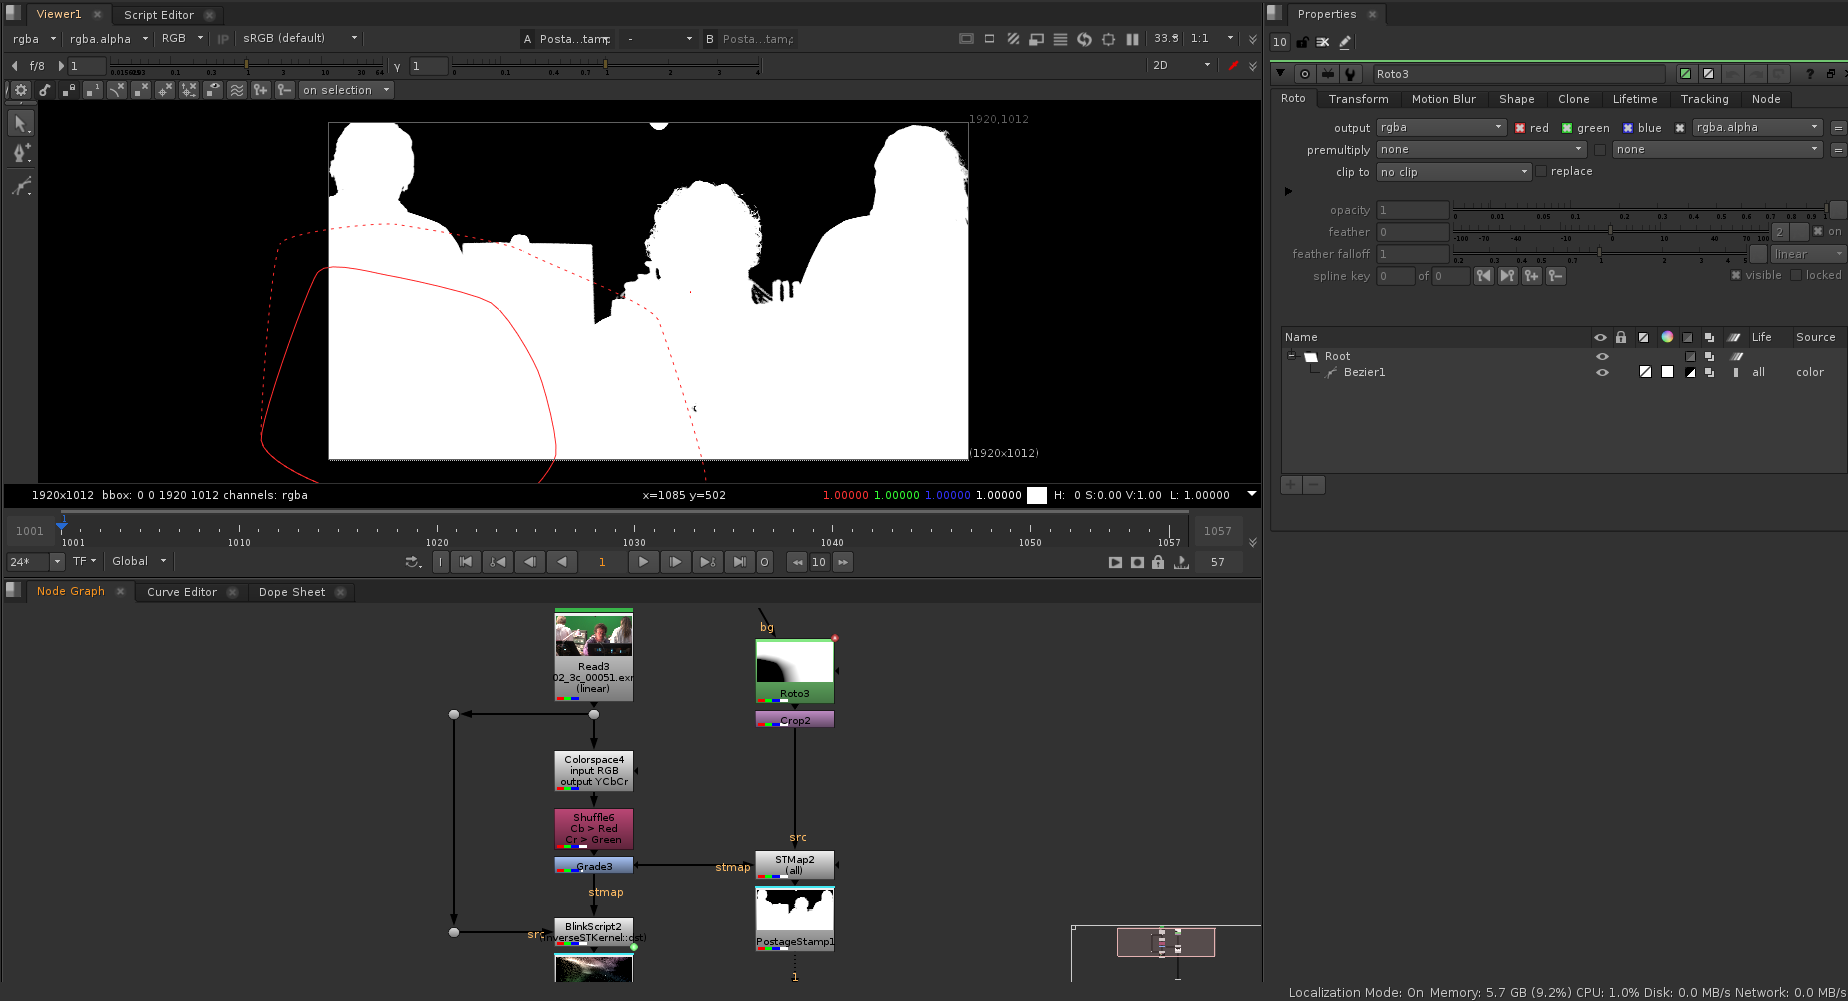
The basic implementation is rather simple: Set 2 channels as the STMap input of an STMap node, and a roto as the source.
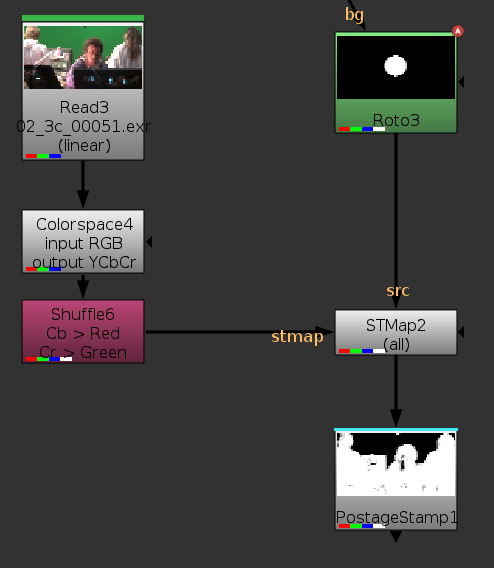
At this point we can adjust the shape to adjust the matte, but we are sort of working blind, we can’t really tell which colors fall where in the roto, making it pretty hard to use.
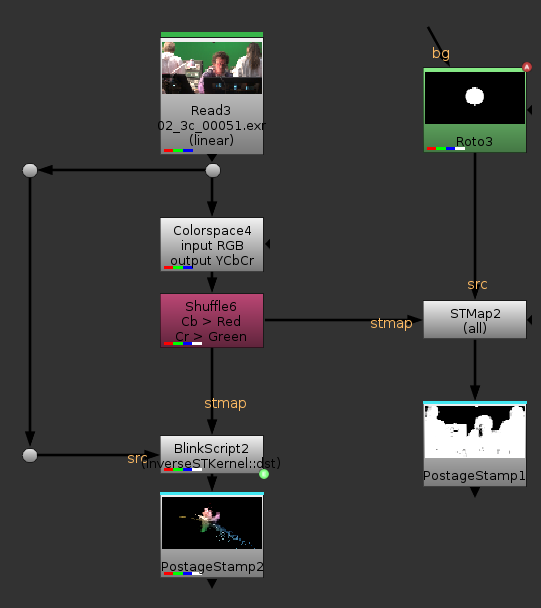
We can use a node to do the reverse operation the STMap would do in order to preview which area we should roto. I adapted a blinkscript snippet Mads posted on the Nuke forum for that purpose:
BlinkScript {
 recompileCount 1
 ProgramGroup 1
 KernelDescription "2 \"InverseSTKernel\" iterate pixelWise 79737837f0b8f5ef5ba9dd8c86c9e76f184ef0da76c94577b5431d3e3e08b063 3 \"src\" Read Point \"stmap\" Read Point \"dst\" Write Random 1 \"resolution\" Float 2 AAAAAAAAAAA= 1 \"resolution\" 2 1 0"
 kernelSource "// Original Kernel by Mads Hagbarth, modified to use STMaps by Erwan Leroy\n\nkernel InverseSTKernel : ImageComputationKernel<ePixelWise>\n\{\n  Image<eRead, eAccessPoint, eEdgeClamped> src;\n  Image<eRead, eAccessPoint, eEdgeClamped> stmap;\n  Image<eWrite, eAccessRandom> dst;\n\n  param:\n    float2 resolution;\n\n  void process() \{\n    float2 uv;\n    uv.x = stmap().x * resolution.x - 0.5f;\n    uv.y = stmap().y * resolution.y - 0.5f;\n    //always make sure that you don't write outside bounds\n    //as it will usually crash nuke.\n    if (dst.bounds.inside(uv.x,uv.y)) \{ \n      dst(uv.x,uv.y) = src(); \n    \}\n  \}\n\};"
 useGPUIfAvailable false
 rebuild ""
 InverseSTKernel_resolution {{width} {height}}
 rebuild_finalise ""
}
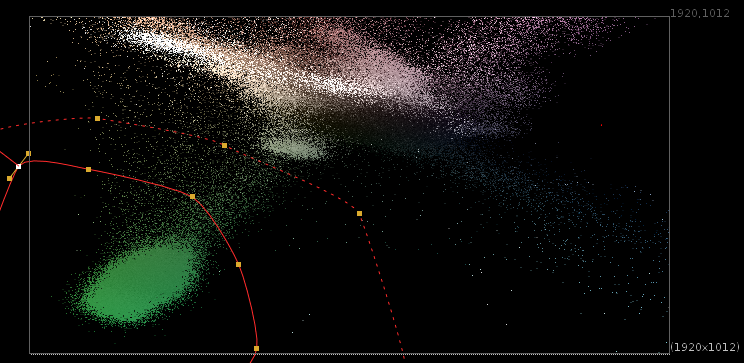
Plugging this to the same STMap input as the previous setup and the plate as a source gives us a 2d point cloud representation of the image in CbCr space.
Adding a reverse STMap gives us a cool point cloud to look at.
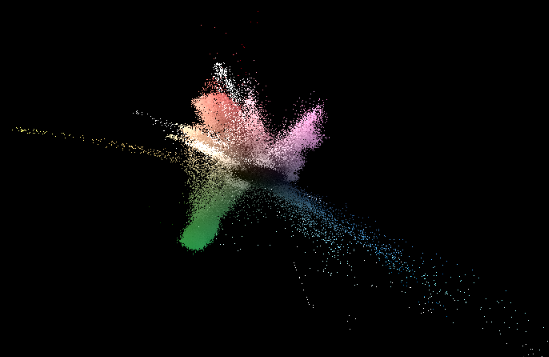
It becomes more obvious where to draw our roto shape now, doesn’t it?
I could go ahead and roto the green points now, however I find them all a bit too squished together for my taste. I know I’m only interested in the green points in this case, so it would be nice if I could “zoom in” on them more. Since this is all driven by our custom STMap, all we need to do to zoom in on this area is to adjust our black point and white points in red and green. I will let you play with it to see how it behaves, but here is where to put the grade:
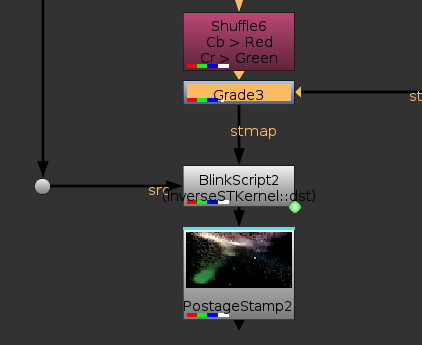
Notice how the postage stamp shows that we zoomed in on the green dots
Now all I need to do is create a roto based on these points:
I need to set my mask to be black in the area I roto’d and white outside, so I just inverted my rotoshape. A cool thing is I could come in here and add tiny masks or paint strokes to control the value of each color. The end result, with no tweaking at all, looks like this:
Not bad for a custom key that can be built in a few minutes. The technique can also be used to achieve some rather funky results. For example below I painted colors instead of a black and white matte, to achieve a trippy look:
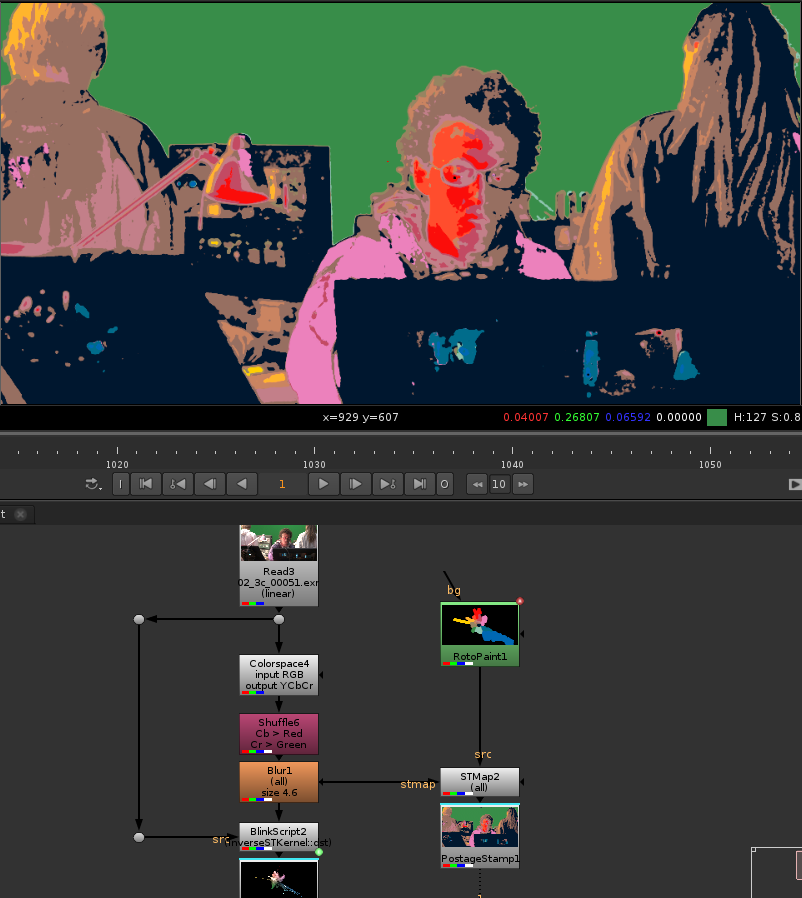
Arguably, this is not the prettiest image. YCbCr is a decent space to key with 2 channels, discarding the Y, and only using the Cb and Cr channels, but it’s not the most representative of an image, so here we defined colors but the luminance isn’t used at all.
Hopefully this can give ideas to a few of you, or help with keying some of these weird plates we sometimes receive.
Edit: Chris Fryer made a really cool video exploring the concepts exposed here, check it out: https://www.chrisfryer.co.uk/post/artistically-driven-keying-despill-experiments-with-blinkscript
Edit: Some people seems to have had issues reproducing the setup, so here is a similar setup you can copy and paste into nuke.
set cut_paste_input [stack 0]
version 11.2 v4
ColorBars {
 inputs 0
 name ColorBars1
 selected true
 xpos 2
 ypos -334
}
Blur {
 size 150
 name Blur1
 label "size \[value size]"
 selected true
 xpos 2
 ypos -262
}
Dot {
 name Dot2
 tile_color 0xcc804e00
 label plate
 note_font_size 30
 selected true
 xpos 36
 ypos -184
}
set N12350460 [stack 0]
Colorspace {
 colorspace_out YCbCr
 name Colorspace1
 label "input \[value colorspace_in]\noutput \[value colorspace_out]"
 selected true
 xpos 2
 ypos -121
}
Shuffle {
 red green
 green blue
 blue black
 name Shuffle1
 label "in \[value in]-->out \[value out]"
 selected true
 xpos 2
 ypos -73
}
Dot {
 name Dot3
 tile_color 0x9e3c6300
 selected true
 xpos 36
 ypos -10
}
set N1456efa0 [stack 0]
Dot {
 name Dot4
 tile_color 0x9e3c6300
 selected true
 xpos 264
 ypos -10
}
push $N1456efa0
push $N12350460
Dot {
 name Dot1
 tile_color 0xcc804e00
 selected true
 xpos -110
 ypos -60
}
BlinkScript {
 inputs 2
 recompileCount 1
 ProgramGroup 1
 KernelDescription "2 \"InverseSTKernel\" iterate pixelWise 79737837f0b8f5ef5ba9dd8c86c9e76f184ef0da76c94577b5431d3e3e08b063 3 \"src\" Read Point \"stmap\" Read Point \"dst\" Write Random 1 \"resolution\" Float 2 AAAAAAAAAAA= 1 \"resolution\" 2 1 0"
 kernelSource "// Original Kernel by Mads Hagbarth, modified to use STMaps by Erwan Leroy\n\nkernel InverseSTKernel : ImageComputationKernel<ePixelWise>\n\{\n  Image<eRead, eAccessPoint, eEdgeClamped> src;\n  Image<eRead, eAccessPoint, eEdgeClamped> stmap;\n  Image<eWrite, eAccessRandom> dst;\n\n  param:\n    float2 resolution;\n\n  void process() \{\n    float2 uv;\n    uv.x = stmap().x * resolution.x - 0.5f;\n    uv.y = stmap().y * resolution.y - 0.5f;\n    //always make sure that you don't write outside bounds\n    //as it will usually crash nuke.\n    if (dst.bounds.inside(uv.x,uv.y)) \{ \n      dst(uv.x,uv.y) = src(); \n    \}\n  \}\n\};"
 useGPUIfAvailable false
 rebuild ""
 InverseSTKernel_resolution {{width} {height}}
 rebuild_finalise ""
 name BlinkScript1
 selected true
 xpos 2
 ypos 60
}
Roto {
 output alpha
 cliptype none
 replace true
 curves {{{v x3f99999a}
  {f 0}
  {n
   {layer Root
    {f 2097152}
    {t x44800000 x44428000}
    {a pt1x 0 pt1y 0 pt2x 0 pt2y 0 pt3x 0 pt3y 0 pt4x 0 pt4y 0 ptex00 0 ptex01 0 ptex02 0 ptex03 0 ptex10 0 ptex11 0 ptex12 0 ptex13 0 ptex20 0 ptex21 0 ptex22 0 ptex23 0 ptex30 0 ptex31 0 ptex32 0 ptex33 0 ptof1x 0 ptof1y 0 ptof2x 0 ptof2y 0 ptof3x 0 ptof3y 0 ptof4x 0 ptof4y 0 pterr 0 ptrefset 0 ptmot x40800000 ptref 0}
    {curvegroup Bezier1 512 bezier
     {{cc
       {f 8192}
       {px 1
        {xc0000000 0}
        {x440d8000 x44024000}
        {x40000000 0}
        {xc1a80000 x41000000}
        {x442ec000 x43f70000}
        {x41a80000 xc1000000}
        {xc0800000 x41d80000}
        {x4440c667 x43bf0000}
        {x40800000 xc1d80000}
        {x40a00000 x41400000}
        {x4441c000 x43928000}
        {xc0a00000 xc1400000}
        {x41b80000 x40000000}
        {x442b0000 x43750000}
        {xc1b80000 xc0000000}
        {x41500000 xc1500000}
        {x440c0000 x438d8000}
        {xc1500000 x41500000}
        {0 xc1700000}
        {x43f60000 x43b48000}
        {0 x41700000}
        {0 0}
        {x43fe8000 x43dc8000}
        {0 0}}}
      {cc
       {f 8192}
       {px 1
        {xc0000000 0}
        {0 0}
        {x40000000 0}
        {xc1a80000 x41000000}
        {x421903f0 x42c8da30}
        {x41a80000 xc1000000}
        {xc0800000 x41d80000}
        {x431a824c x41b71e70}
        {x40800000 xc1d80000}
        {x40a00000 x41400000}
        {x433eb874 xc29ef132}
        {xc0a00000 xc1400000}
        {x41b80000 x40000000}
        {0 0}
        {xc1b80000 xc0000000}
        {x41500000 xc1500000}
        {0 0}
        {xc1500000 x41500000}
        {0 xc1700000}
        {0 0}
        {0 x41700000}
        {0 0}
        {0 0}
        {0 0}}}}
     {tx 1 x441e1000 x43bcc000}
     {a osw x41200000 osf 0 str 1 spx x44800000 spy x44428000 sb 1 tt x40800000}}}}}}
 toolbox {selectAll {
  { selectAll str 1 ssx 1 ssy 1 sf 1 }
  { createBezier str 1 ssx 1 ssy 1 sf 1 sb 1 tt 4 }
  { createBezierCusped str 1 ssx 1 ssy 1 sf 1 sb 1 }
  { createBSpline str 1 ssx 1 ssy 1 sf 1 sb 1 }
  { createEllipse str 1 ssx 1 ssy 1 sf 1 sb 1 }
  { createRectangle str 1 ssx 1 ssy 1 sf 1 sb 1 }
  { createRectangleCusped str 1 ssx 1 ssy 1 sf 1 sb 1 }
  { brush str 1 ssx 1 ssy 1 sf 1 sb 1 }
  { eraser src 2 str 1 ssx 1 ssy 1 sf 1 sb 1 }
  { clone src 1 str 1 ssx 1 ssy 1 sf 1 sb 1 }
  { reveal src 3 str 1 ssx 1 ssy 1 sf 1 sb 1 }
  { dodge src 1 str 1 ssx 1 ssy 1 sf 1 sb 1 }
  { burn src 1 str 1 ssx 1 ssy 1 sf 1 sb 1 }
  { blur src 1 str 1 ssx 1 ssy 1 sf 1 sb 1 }
  { sharpen src 1 str 1 ssx 1 ssy 1 sf 1 sb 1 }
  { smear src 1 str 1 ssx 1 ssy 1 sf 1 sb 1 }
} }
 toolbar_brush_hardness 0.200000003
 toolbar_source_transform_scale {1 1}
 toolbar_source_transform_center {1024 778}
 colorOverlay {0 0 0 0}
 lifetime_type "all frames"
 motionblur_shutter_offset_type centred
 source_black_outside true
 link_output false
 name Roto1
 selected true
 xpos 2
 ypos 138
}
Shuffle {
 red alpha
 green alpha
 blue alpha
 name Shuffle2
 label "in \[value in]-->out \[value out]"
 selected true
 xpos 2
 ypos 174
}
STMap {
 inputs 2
 uv rgb
 name STMap1
 selected true
 xpos 230
 ypos 174
}
push $N12350460
Dot {
 name Dot5
 tile_color 0xcc804e00
 selected true
 xpos 419
 ypos -184
}
Merge2 {
 inputs 2
 operation mask
 bbox B
 name Merge1
 selected true
 xpos 385
 ypos 231
}
Awesome. It’s sure about time we get a better keyer ! What’s coming first AI or Lidar at capture time ? Thanks !!
I would say AI has a better chance of being there first. Lots of hardware investment to get rgbz cameras, plus getting them to the quality of current high end digital cameras. AI solutions are a bit slow on current hardware but can still work, and should be getting faster with newer GPUs in the next few years.
Cool, dont know how handy its gonna be for me but it for sure made me understand STmaps better, thanks!
Do we have any specific video tutorial for the same?
It will be super helpful if so…
There is no video tutorial, I usually prefer written ones, but if somebody wants to make a video to illustrate that feel free.
Chris Fryer made a video about it: https://www.chrisfryer.co.uk/post/artistically-driven-keying-despill-experiments-with-blinkscript
I tried copy the blinkscript without success, could you share your script to make it clearer what’s going on?
Thank you
I’m updating the article with an example.
It’s not exactly the same as the original but close enough.
Any idea share this keying single frame nuke script
Hi Erwan,
I am trying to work the blink script but it just keeps giving me an error “Error compiling kernel: Error at line: 3 unknown type name ‘recompileCount’ “
It is possible that you have an older version of nuke that did not have this knob.
It’s not an important one, so you should be able to remove this line before you paste it.
This is great! Lots of respect for people who can figure out how to use regular nodes in totally unusual ways.
Also, not sure if you already explored this but if you open up a Vectorscope panel in Nuke, the display on there is almost exactly the same as the inverse stmap visualization. If you plug in a ColorWheel node, you’ll see the same primary/secondary color hexagon in both. This probably means that the YCbCr color transforms used in the video world for signal encoding and for vectorscope monitoring are similar, it’s just amazing that they can map out in UV space.
I’m using the Colorwheel input to see where colors live overall and compare to what is available in the plate. If anyone packages this into a gizmo, it might be nice to reformat the inverse STMap output so it always stay the same aspect ratio and resolution. This means roto and color positions can be more consistent between different size plates.
Thanks Mike.
About the Vectorscope, we did see that correlation in the article where I was playing with the pointrender node.
Also turns out Mads Hagbarth already has a gizmo that sort of does what I did in this article on Nukepedia.
Really neat tutorial Erwan thanks for that !
Do you have the link of the gizmo from Mads? I couldn’t find it on nukepedia
https://hagbarth.net/cube-keyer-for-nuke-studio-hiero/
It’s using a similar method under the hood but quite different user interaction.
thanks for that ! Erwan your tutorials are always handy !
Thanks Erwan! Awesome stuff as always.
[…] Make A Custom Advanced Keyer Using ST Map, from Erwan Leroy. […]
that’s very nifty and very well explained.
Thank you air.
First of all, thank you for sharing this Erwan. It’s a really neat concept.
I’m a scripting novice. Thought I’d post this here as the blinkscript wouldn’t work for me and took a while to figure out. It might be helpful for someone.
set cut_paste_input [stack 0]
version 11.3 v1
ColorWheel {
inputs 0
gamma 0.45
name ColorWheel1
selected true
xpos 27
ypos -646
}
Dot {
name Dot2
selected true
xpos 49
ypos -540
}
set N8dddec00 [stack 0]
Colorspace {
colorspace_in sRGB
colorspace_out YCbCr
name Colorspace1
selected true
xpos 27
ypos -451
}
set Nd093a000 [stack 0]
push $cut_paste_input
Roto {
output alpha
curves {{{v x3f99999a}
{f 0}
{n
{layer Root
{f 2097152}
{t x44800000 x44428000}
{a pt1x 0 pt1y 0 pt2x 0 pt2y 0 pt3x 0 pt3y 0 pt4x 0 pt4y 0 ptex00 0 ptex01 0 ptex02 0 ptex03 0 ptex10 0 ptex11 0 ptex12 0 ptex13 0 ptex20 0 ptex21 0 ptex22 0 ptex23 0 ptex30 0 ptex31 0 ptex32 0 ptex33 0 ptof1x 0 ptof1y 0 ptof2x 0 ptof2y 0 ptof3x 0 ptof3y 0 ptof4x 0 ptof4y 0 pterr 0 ptrefset 0 ptmot x40800000 ptref 0}
{curvegroup Bezier1 512 bezier
{{cc
{f 8192}
{px 1
{x40000000 xc0000000}
{x44b75331 x44484001}
{xc0000000 x40000000}
{x417e6480 x42a2666c}
{x449cdcd2 x410ccca0}
{xc2859a60 xc3aa9464}
{xc30e0000 xc2d80000}
{x4533a99b x43a2e662}
{x430e0000 x42d80000}
{x42f00000 xc2840000}
{x45321334 x440a3334}
{xc2f00000 x42840000}}} idem}
{tx 1 x4486d000 x43f68000}
{a osw x41200000 osf 0 str 1 spx x44800000 spy x44428000 sb 1 tt x40800000}}}}}}
toolbox {selectAll {
{ selectAll str 1 ssx 1 ssy 1 sf 1 }
{ createBezier str 1 ssx 1 ssy 1 sf 1 sb 1 tt 4 }
{ createBezierCusped str 1 ssx 1 ssy 1 sf 1 sb 1 }
{ createBSpline str 1 ssx 1 ssy 1 sf 1 sb 1 }
{ createEllipse str 1 ssx 1 ssy 1 sf 1 sb 1 }
{ createRectangle str 1 ssx 1 ssy 1 sf 1 sb 1 }
{ createRectangleCusped str 1 ssx 1 ssy 1 sf 1 sb 1 }
{ brush str 1 ssx 1 ssy 1 sf 1 sb 1 }
{ eraser src 2 str 1 ssx 1 ssy 1 sf 1 sb 1 }
{ clone src 1 str 1 ssx 1 ssy 1 sf 1 sb 1 }
{ reveal src 3 str 1 ssx 1 ssy 1 sf 1 sb 1 }
{ dodge src 1 str 1 ssx 1 ssy 1 sf 1 sb 1 }
{ burn src 1 str 1 ssx 1 ssy 1 sf 1 sb 1 }
{ blur src 1 str 1 ssx 1 ssy 1 sf 1 sb 1 }
{ sharpen src 1 str 1 ssx 1 ssy 1 sf 1 sb 1 }
{ smear src 1 str 1 ssx 1 ssy 1 sf 1 sb 1 }
} }
toolbar_brush_hardness 0.200000003
toolbar_source_transform_scale {1 1}
toolbar_source_transform_center {1024 778}
colorOverlay {0 0 0 0}
lifetime_type “all frames”
motionblur_shutter_offset_type centred
source_black_outside true
name Roto1
selected true
xpos 279
ypos -560
}
STMap {
inputs 2
uv rgba
name STMap1
selected true
xpos 279
ypos -457
}
push $Nd093a000
push $N8dddec00
Dot {
name Dot4
selected true
xpos -83
ypos -540
}
Dot {
name Dot3
selected true
xpos -83
ypos -207
}
BlinkScript {
inputs 2
recompileCount 52
ProgramGroup 1
KernelDescription “2 \”InverseSTKernel\” iterate pixelWise 4d0e2d9278c7c99711b163450c9e0612847e5be4663122dad049587e1232d4c6 3 \”src\” Read Point \”stmap\” Read Point \”dst\” Write Random 1 \”resolution\” Float 2 AAAAAAAAAAA= 1 \”resolution\” 2 1 0″
kernelSource “kernel InverseSTKernel : ImageComputationKernel\n\{\n Image src;\n Image stmap;\n Image dst;\n\n param:\n float2 resolution;\n void process() \n\{\n float2 uv;\n uv.x = stmap().x * resolution.x – 0.5f;\n uv.y = stmap().y * resolution.y – 0.5f;\n \n//always make sure that you don’t write outside bounds\\n //as it will usually crash nuke.\n if (dst.bounds.inside(uv.x,uv.y)) \n\{ \n dst(uv.x,uv.y) = src(); \n\} \n\}\n\};\n\n”
useGPUIfAvailable false
vectorize false
rebuild “”
InverseSTKernel_resolution {1920 1080}
format “1920 1080 0 0 1920 1080 1 HD_1080”
specifiedFormat true
rebuild_finalise “”
name BlinkScript6
label “keyer ifx”
selected true
xpos 27
ypos -212
}