
(Edited 2021: Starting with Nuke 13, and VFXplatform 2020, Python 3 is now the standard! This article has been edited to reflect that new standard while trying to keep the original content from 2015. The code examples will be updated to be compatible with both Python 2 and 3, and I’ll be putting a few notes in parenthesis throughout the article.)
Fellow compositor and VFX students often approached me wondering how and why to learn Python.
I decided to compile and write down a summary of the many different advises I have about it.
Why should I learn Python?
It is true you don’t need to know anything about coding to be a VFX artist, you can become a top-notch artist on high-end projects without ever writing a line of code.
Still, I would recommend learning the very basics, as it could save you a lot of time in some occasions.
A bit of coding knowledge won’t make you a better artist, it will just make you a more efficient one.
Example Scenario: You’ve been working for a week on the “Awesome Nuke Project”, which was located in the folder “/projects/awesomeNkueProject/”
This morning, a producer realized there was a typo in the folder name and decided to fix it.
You open your nuke script, and none of the 87 read nodes can find the media. Maybe you should have used a relative file path, but you didn’t.
You don’t know anything about python, so you proceed to rage against your producer and painfully re-link your read nodes one by one.
Or you could have opened the script editor and typed:
for node in nuke.selectedNodes():
    file = node.knob('file').value()
    file = file.replace('awesomeNkueProject','awesomeNukeProject')
    node.knob('file').setValue(file)
That’s a pretty beginner-level code, it’s far from being perfect but would do the job much faster than you would manually.(What’s wrong with this code?)
How do I get started?
While there are many ways to get started, with books, tutorials or diving right in with Nuke, I would recommend learning the basic Python Syntax first.
At the moment, Nuke and many other VFX applications are using a version of Python 2. Python 3 also exists, but it is not at the moment a standard for VFX.
The VFX Platform, a list of tools published by the Visual Effects Society, lists Python 2.7.x as the reference for 2015, so that’s what we’ll be looking at.
Reads: Python 2 VS Python 3, VFX Platform
(Edit 2021: Python 3 is now the standard)
I believe one of the easiest and less boring ways to learn python is to use the website Codecademy: http://www.codecademy.com/en/tracks/python
Codecademy is teaching Python 2.7.3, which is the same Nuke is using.
My favourite part is that you don’t need to install anything, you can code and run your code directly in the browser.
No need to complete the whole course, but I would recommend going at least until the “Loops” chapter. (Just before the advanced Topics)
Of course, if finish the whole course that wouldn’t hurt.
(Edit 2021: Codecademy still offers the Python 2 course for free, but charges for the Python 3 one. I haven’t needed to re-learn python from scratch so I’m not really up to date on the best courses. If anyone has recommendations, please post in the comments or email me!)
Cool, I can write some Python now, but how do I use it in Nuke?
Well, there are many things you can do in Nuke with Python, and covering all of it would take me a lot of time.
Luckily, the Foundry already wrote that document, and you can find it here: https://learn.foundry.com/nuke/developers/130/pythondevguide/
Let’s write our first code inside Nuke. Right-click on the “tabs” area in the user interface and select the script editor.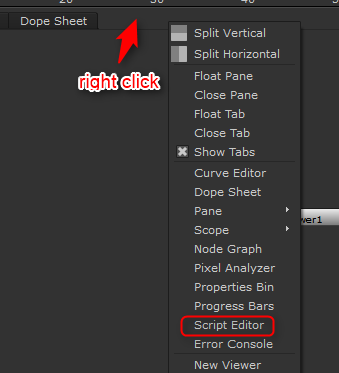
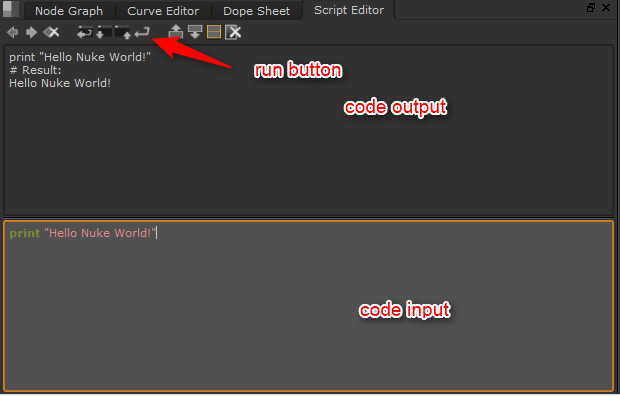
The script editor itself has two windows, an input part at the bottom, that’s where you write your code, and an output part on top, which will return the result from your code.
Let’s Type:
print "Hello Nuke World!"
and run it by pressing the “run” button or Ctrl+Enter
You ran your first code in Nuke, you can be proud, but that’s not so useful by itself.
Let’s look at a few useful things to do:
Accessing and Modifying nodes:
In the official getting started documentation, they show us how to easily create and access nodes, but let’s make our own example. First, let’s create a blur node. You can create it the normal way, or via Python.
There are two ways to create a Node via python:
nuke.createNode('Blur')
nuke.nodes.Blur()
The first thing to do when we want to manipulate Nuke objects is to let Python know we’re using a function of the Nuke module.
We use “nuke.” to call a nuke function. “nuke.createNode(‘XXX’)” is the Function called when you create a node using the user interface. It will create a node, and connect it to the currently selected node if one is selected, apply your custom default settings if you have some, place it in the node graph, and a few other “convenient” things.
“nuke.nodes.XXX()” on the other hand, will only create the node. It will do nothing else, letting you handle the connecting, placing, etc…
To manipulate our node, it would be nice to store it into a variable. If you’ve been through the python tutorials on Codecademy or others, you know that python can store pretty much anything into a variable. We can easily save nodes, lists of nodes or even dictionaries full of nodes into a variable.
There are a few ways to do this. The easiest would have been for us to store it directly at creation, like so:
node = nuke.createNode('Blur')
But we didn’t, so we need to find another way. Also, that would only work for nodes we created via python, and let’s face it, nobody wants to work entirely with command-line.
node = nuke.selectedNode()
The “selectedNode()” function is extremely useful, it’s a quick way to tell python we want to work with the currently selected node. If there is more than one node selected, Nuke will try to guess which one we’re talking about. I wouldn’t recommend using this function if more than one node is selected. We’ll take a look at “selectedNodes()” a bit later.
node = nuke.toNode('Blur1')
The “toNode()” function is good for selecting a single node for which we know the name. Here we created a Blur node in an empty scene, so its name is “Blur1” by default.

Every parameter of a node is called a knob.
By hovering over a knob, you can see its name showing. It’s usually the same as the label next to it but not always, so it may be useful to double-check. After a while, you’ll start to know all the knob names for the common nodes. Let’s access our size knob in Python. Our Blur node should still be stored into the “node” variable:
print(node.knob('size').name())
print(node.knob('size').value())
# Result:
size
0.0
Also, we could consider the node object in python to be a dictionary of knobs (it’s not, but it acts almost the same), so we could access the knobs like so:
print(node['size'].name())
print(node['size'].value())
Let’s change our size value to be 5 instead of 0:
knob = node['size']
size = knob.value()
print(size)
# We didn't really need to know the size,
# but it would have been usefull if I was trying to multiply the size by 2 for example
newSize = 5
knob.setValue(newSize)
print(node['size'].value())
I used a lot of variable assignments here, to show how we could do it, but for such a simple example I could have done:
node['size'].setValue(5)
You should now be able to access and modify knobs on nodes.
Creating Functions
If you have been through the python tutorials on Codecademy or somewhere else, you know what is a function. For the others rushing through, let me try to explain.
A function is pretty much a group of commands, that have been pre-defined to accomplish a specific task.
We could compare a function to a Nuke Gizmo. It can contain many nodes and do a lot of things, but in the end, we can re-use it over and over again, with different inputs and values, without creating a gigantic mess in our script.
Let’s create a very easy function, which also happens to be quite useful.
This function, which I call “changeKnobs” has only one use: Modify the value of a specific knob across all the selected nodes. (Note 2021: I used to name my functions in camelCase, like this example, as this is what is used in the Nuke API. After I started working on large codebases written in python, I adopted the recommended python snake_case, so I would now call this function “change_knobs”, or go for something even more explicit, like “set_values_on_selected_nodes”)
Let’s see how to define a function:
def changeKnobs():
Pretty straightforward. “def” tells python we want to define a function, it’s followed by the name of the function, parenthesis will contain arguments (more on this in a sec), and finally, we need a “:” to finish the line.
In order to make this function useful, we will need to give it a few arguments. Arguments are specific parameters we can give our function in order to make it behave a way or another. It can be compared to the input and settings of a gizmo. Even if the gizmo is always the same, it will output something different depending on what you feed it.
Arguments are what you feed a function. Some functions may not need any arguments, but this one does.
We need to tell our function which knob to modify, and what value to assign to it:
def changeKnobs(knobName, value):
It’s that simple. When we will call our function later, we will type “changeKnob(‘xxxx’, 0000)”. Whatever we type as the first argument (here “xxxx”) will be accessible inside the function as the variable “knobName”, the second one will be accessible as the variable “value”.
Let’s jump ahead and look directly at the finished function:
def changeKnobs( knobName, value):
    for node in nuke.selectedNodes():
        if knobname in node.knobs():
            node.knob(knobName).setValue(value)
The second line here is interesting. It is our first encounter with the built-in nuke function called “selectedNodes” that I talked about a bit earlier. “selectedNodes” returns a list of all the selected nodes.
That line could be read as: “For each node in the list of selected nodes, do this:”
The following one is our first “if” statement, also an extremely common thing to do. Here we say “if the node does have a knob called this name, then do that:”
Finally the last command you’re already familiar with, to change the actual Value.
Note the indentation of the code. In Python, we indent the code in order to indicate what is inside of what.
# This comment is gonna be the first thing to go through python.
# Let's start a loop
for number in range(10):
    # This comment is inside the loop, as well as everything with this indentation.
    print(number)
    if number == 9:
        # This comment is inside the if statement, which is inside the loop.
        print("Woah, we already counted all the way to 9!")
     #This comment is still in the loop, but not part of the if statement anymore.
# That last comment is now outside of the loop, as the indentation is back to the same level as the beginning.
Without indentation, the code would not run properly, or at all.
Finally, in order to run our changeKnobs function, we need to run it.
Let’s say we want to change the value of many blur nodes’ size to a size of 50.
As we used “selectedNodes” in our function, the first step is to select the nodes in our Node graph. It’s ok to select some other nodes as well. Thanks to our “if” statement, only nodes that actually have the knob we want to change will be affected.
Once our selection is done, type and run:
changeKnobs('size', 50):
Remember that knob names are strings, so they should be in ” or “”. Without that, it will be looking for the variable called size, and give you an error if it doesn’t exist.
That’s it for functions for now.
menu.py and init.py
Last but not least for today, I’d like to say just a quick word about init.py and menu.py.
These two files are files that nuke runs every time when starting.
init.py is run every single time, no matter how you start nuke, while menu.py will only run if you start nuke with a graphical user interface (basically doesn’t run when rendering on the farm in command line).
Depending on if you’re using Nuke on Mac, Linux or Windows, the files may be located in different places, or may not exist at all.
By default it should be in your user, in a folder called “.nuke”, but you can make sure by running this command:
print(nuke.pluginPath())
# Result:
['C:/Users/Erwan/.nuke', 'C:\\Program Files\\Common Files/Nuke/8.0/plugins', 'C:/Program Files/Nuke8.0v1/plugins/user', 'C:/Program Files/Nuke8.0v1/plugins/icons', 'C:/Program Files/Nuke8.0v1/plugins']
If you were to create an init.py or menu.py in any of these folders, they would run when Nuke is starting.
Let’s create a menu.py in “…/user/.nuke/”. In it, let’s write this code:
def changeKnobs( knobName, value):
    for node in nuke.selectedNodes():
        if node.knobs().has_key(knobName):
            node.knob(knobName).setValue(value)

nuke.menu( "Nuke" ).addCommand("Edit/Node/Make Pink", lambda:changeKnobs('tile_color', 4288256256), "e")
You can recognize our previously defined function changeKnobs. It will now always be available in the script editor. I also added a command to the Edit menu to change the colour of the node to pink, and assigned the keyboard shortcut “e” to it, because I really like pink nodes. (and yes, 4288256256 does mean pink, but that may deserve a dedicated article – see here)
If I had added that menu directly from the script editor, it would have worked as well but would have disappeared the next time I restarted Nuke.
Cool, I understand now, but how do I find all the syntax for all the tools nuke has to offer?
There are A LOT of functions to remember, and honestly, I don’t think anyone remembers every single one of them.
Every time I am writing tools, I have a few web pages open:
Nuke Python developer’s guide: The official Guide by the foundry.
Nuke Python API reference: Another official piece of documentation. It lists every single function and class and things available in the nuke module. It doesn’t look friendly (learn more about it here), but it is invaluable.
I also like to have the python documentation and a search engine around, it always helps when you forget how to use one of the functions. Ultimately, when you get stuck, don’t hesitate to ask on the foundry forums.
That article ended up being a bit longer than I expected, I hope I didn’t bore anyone to death.
Have fun coding!
Great Guide. Good for learning, even more as a quick reference/cheat sheet. Thanks
Thanks Dan.
I have a few more planned to be used as cheat sheet.
Great one.. looking forward to see more from you. 🙂
Very helpful. Thanks!